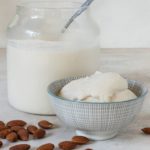
Homemade Vegan Yogurt in the EuroCrusine Yogurt Maker
Creating your own Raw yogurt with almond milk will save you from having to eat dairy. Also if you use the Fage yogurt as recommened you will get many benifical bacteria.Most yogurts do not have benifical bacteria. If it does the bacteria will be labled on the container.
Yield: 5 cups
Cost: 4.00
Equipment
- A small pot
- A candy thermometer
- EuroCrusine Yogurt Maker
Materials
- 4 cups homemade almond milk about 4 cups (you can try substituting with store bought – let me know how it goes)
- 2 tbsp Two heaping tablespoons tapioca starch AKA -tapioca flour(available at health food stores, specialty shops, or ‘ethnic’ markets)(I found this at Meijer’s and is not stocked in local Meijer, however found in Krogers.)
- 1 tbsp One tablespoon organic evaporated cane juice or sugar; I’ve tried maple syrup with no luck (I bought this from Meijer.)
- 1 tbsp Some sort of culture If this is your first time you have three options: 1 tablespoon store bought nondairy yogurt, 1 non-dairy probiotic capsule(refrigerated only, as the shelf stable ones are not alive, or a non-dairy yogurt starter.) (Every time you make a batch of yogurt, save some of it to use as a starter for your next batch. this will save you a lot of money!)
Instructions
- Pour the entire batch of alt milk into the pot, over medium heat. Whisk in the tapioca starch and the sugar. Allow the milk to heat slowly until it reaches 180º F, whisking frequently. Don’t let it boil!
- When it’s reached 180º remove it from heat. Give it a good whisk, cover it, and set aside to cool. It will take 1 or 2 hours to cool down completely. You may be tempted to expedite the process by putting it in the fridge but I don’t recommend this. It can lead to tapioca lumps! Stir every so often to help prevent getting lumps.
- At this point, remove your starter, whatever it may be, from the fridge. You want it to be room temperature when you add it to the mix. I’ve tried various soy and coconut milk yogurts with equal success. Just make sure that whatever you use is plain, unpasteurized, and explicitly says “live active cultures”. If this is not your first batch of yogurt, you should be using the last few tablespoons of your previous batch!
- The mix needs to cool to below 110º F, but closer to 90º is better. If it’s too hot it will kill the starter cultures. When it has appropriately cooled, place about 2 cups of mix in a cup and add your starter and whisk thoroughly to combine. Don’t add too much! More does NOT equal better – the bacteria need ‘room’ to grow. A full tablespoon of store bought yogurt or a few tablespoons of leftover homemade yogurt, or a single probiotic pill. Now take the 2 cups of mix with the starter whisked in and add it to the rest of the mix, whisking it in thoroughly to combine.
- Pour the entire mixture into the Yogurt Maker. Cover with the lid. Place the dome on top, plug in, power on, and set time. Leave alone until done.
- Done! You will know your yogurt has fermented if it has a bit of a tang to it. The longer you let it culture, the more sour it gets. Be careful – it can get pretty sour! When it’s done transfer it to the fridge, without stirring or shaking, and let it set up in there for a few hours. It will thicken, but probably not as much as traditional yogurt.
- 9-10 hours has worked well for us, if you want more tang leave it longer.
Notes
Clean all equipment and counter space being used. You do not want to let bad bacteria to grow.